To install engineered hardwood flooring, start by gathering the necessary tools like a tape measure, saw, and hammer. Next, prepare your subfloor by ensuring it's clean, level, and dry. Allow the planks to acclimate for 48 to 72 hours in your installation area. Plan your layout, choosing the plank direction wisely. Roll out your underlayment and begin laying the planks, ensuring they're staggered for stability. Cut and fit boards as needed, then secure the edges with adhesive. Finally, maintain your floor by sweeping and damp mopping regularly. Stick around to uncover more detailed tips for a successful installation!
Gather Your Tools and Materials
Before you immerse yourself in installing engineered hardwood flooring, it's essential to gather all the necessary tools and materials. Start with a solid tools checklist: you'll need a tape measure, saw, hammer, spacers, and a tapping block. Don't forget safety gear like goggles and knee pads to keep yourself protected during the process.
Next, focus on material selection. Choose your engineered hardwood planks based on your desired aesthetic and durability. Consider factors like the finish, width, and thickness of the boards to match your space. By preparing adequately with the right tools and materials, you'll set a strong foundation for your flooring project. This prep work allows you to embark on the installation with confidence and freedom, knowing you're well-equipped for success.
Prepare the Subfloor
With your tools and materials ready, the next step is preparing the subfloor. Start by inspecting the existing subfloor types—plywood, concrete, or OSB. Check for any damage, such as cracks or water stains, which can affect your flooring. Clean the surface thoroughly to remove dust, debris, or old adhesive, ensuring a smooth base for installation. If you find any uneven areas, use a leveling compound to create a flat surface. This step is crucial for preventing future issues with your engineered hardwood. Finally, allow the subfloor to dry completely, especially if you've used any repair materials. By taking the time to prepare your subfloor properly, you'll set the stage for a successful flooring installation.
Acclimate the Flooring
Before you install your engineered hardwood flooring, it's essential to acclimate it to your home's environment. Ideally, this process should take at least 48 to 72 hours, allowing the wood to adjust to the temperature and humidity levels. Make certain to store the planks in a dry, flat area to guarantee ideal conditions for acclimation.
Importance of Acclimation
Acclimating your engineered hardwood flooring is vital for guaranteeing a successful installation and long-term performance. This process allows the planks to reach moisture balance with your home's environment, minimizing the risk of warping or gaps later on. Here are some acclimation benefits to reflect on:
| Benefit | Description | Impact |
|---|---|---|
| Reduced Warping | Helps planks adjust to humidity levels | Longer lifespan |
| Improved Stability | Guarantees the flooring stays intact | Enhanced aesthetic appeal |
| Better Adhesion | Promotes effective bonding with subfloor | Fewer installation issues |
| Increased Comfort | Minimizes noise and movement | More enjoyable living space |
Taking the time to acclimate your flooring will pay off, so don't skip this vital step!
Ideal Acclimation Duration
The ideal acclimation duration for engineered hardwood flooring typically ranges from 48 to 72 hours, depending on the specific product and environmental conditions. During this time, it's essential to take into account acclimation timeframes that align with your home's temperature and humidity levels. High humidity can cause the wood to expand, while low humidity may lead to contraction. To guarantee your flooring performs well, place the boards in the room where they'll be installed, allowing them to adjust to the environment. This process helps minimize potential issues like warping or gaps after installation. Remember, taking the time to acclimate your flooring properly not only supports its longevity but also enhances your overall freedom in design and comfort.
Proper Storage Conditions
To guarantee your engineered hardwood flooring acclimates properly, it's important to store it under the right conditions. Start by ensuring the room's temperature is between 60°F and 80°F. This temperature regulation helps the wood adjust to its new environment. Additionally, maintain humidity control, ideally between 30% and 50%. This prevents the wood from expanding or contracting too much, which can lead to gaps or warping. Place the planks flat in their boxes, away from direct sunlight or heat sources. If possible, leave them in the room where they'll be installed for at least 48 hours. Following these guidelines will help your flooring settle in seamlessly, ensuring a beautiful, long-lasting finish.
Plan Your Layout
Before you start laying down your engineered hardwood flooring, it is essential to plan your layout carefully. Effective layout planning can make all the difference in achieving a beautiful and functional space. Here are some tips to help you decide on your flooring patterns:
- Measure the Room: Know the dimensions to determine the amount of flooring you'll need.
- Choose a Direction: Decide whether you want the planks to run parallel to the longest wall or in a different direction for visual interest.
- Consider Natural Light: Align the planks to enhance light flow and make the space feel larger.
- Test Different Patterns: Lay a few planks in various arrangements to see what feels right before committing.
Taking these steps will guarantee your engineered hardwood flooring looks stunning!
Install Underlayment
Installing the right underlayment is essential for your engineered hardwood flooring project. You'll want to guarantee your subfloor surface is clean and smooth before laying down the underlayment panels properly. This step helps with sound absorption and moisture resistance, making your floors more durable and comfortable.
Choose the Right Underlayment
Choosing the right underlayment is vital for the performance and longevity of your engineered hardwood flooring. There are several underlayment types to take into account, especially if you need a moisture barrier to protect your flooring from any potential damage. Here's how to choose wisely:
- Foam Underlayment – Great for sound absorption and cushioning.
- Felt Underlayment – Provides excellent moisture resistance and durability.
- Cork Underlayment – Eco-friendly option that offers sound dampening and insulation.
- Rubber Underlayment – Ideal for high-traffic areas; it's tough and moisture resistant.
Evaluate your specific needs, such as sound control and moisture management, to make sure you pick the right underlayment for your engineered hardwood flooring project.
Prepare the Subfloor Surface
Once you've selected the appropriate underlayment, preparing the subfloor surface is essential for a successful installation of your engineered hardwood flooring. First, assess the subfloor types—whether it's concrete, plywood, or OSB—ensuring it's clean, dry, and level. Remove any debris, nails, or staples that could interfere with the underlayment. If you find uneven areas, consider using a leveling compound to create a smooth base. Don't forget to check for moisture, as excess can damage your flooring. Proper surface preparation not only enhances the longevity of your flooring but also improves its overall performance. By taking these steps, you'll set yourself up for a hassle-free installation process and enjoy your new floors for years to come.
Install Underlayment Panels Properly
Before laying down your engineered hardwood flooring, it's crucial to install the underlayment panels properly to guarantee peak performance and comfort. The right underlayment types can enhance sound absorption and provide cushioning. Here's how to do it:
- Choose the right underlayment: Select one that suits your flooring type and environment.
- Roll it out: Lay the underlayment parallel to the direction of the planks, ensuring it covers the subfloor completely.
- Seal seams: Use tape to secure seams and prevent moisture from seeping through.
- Trim excess: Cut any excess material around the edges for a clean finish.
Following these steps will set the stage for a beautiful and comfortable floor you'll love.
Begin Laying Planks
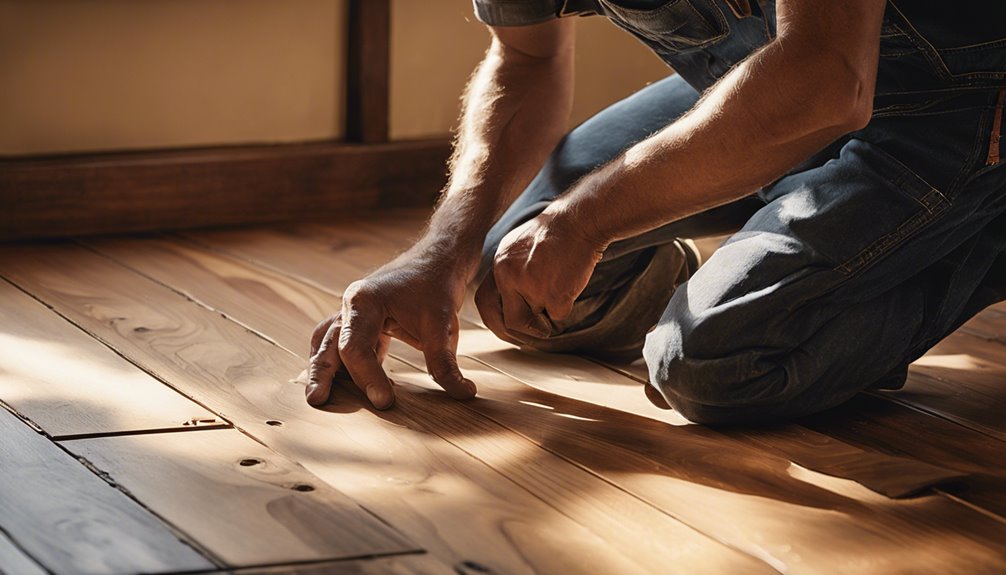
Now that you've prepared your subfloor and gathered your materials, it's time to lay down the engineered hardwood planks. Start in a corner of the room, placing the first plank with the groove side facing the wall. Verify proper plank alignment; this will set the tone for the entire floor. Leave an expansion gap of about 1/4 inch between the planks and the wall to allow for natural movement. As you continue laying the planks, stagger the seams for a more natural look and increased stability. Check each row for alignment as you go to maintain a straight and visually appealing layout. By following these steps, you'll achieve a beautiful, durable floor that enhances your living space.
Cut and Fit Boards
As you continue laying the planks, you'll encounter areas that require cutting to fit the boards properly. Mastering cutting techniques is essential for a seamless look. Here's how to guarantee accuracy:
- Take Accurate Board Measurements: Measure the space where the board will fit, accounting for any obstructions.
- Use a Straight Edge: Mark your cut line clearly with a pencil and use a straight edge for guidance.
- Select the Right Tool: A miter saw or jigsaw works well for clean cuts on engineered hardwood.
- Test Fit Before Finalizing: Always dry-fit boards to check for proper fit before securing them.
This approach will help you achieve a professional finish, giving you the freedom to enjoy your new flooring without worry.
Secure the Edges
Securing the edges of your engineered hardwood flooring is essential for both stability and aesthetics. Start by applying edge sealing to protect against moisture and prevent warping. Use a quality edge sealer, ensuring you cover every seam thoroughly. Next, consider using flooring adhesives for extra security. Applying adhesive along the edges of each board will create a strong bond that keeps them in place, reducing the risk of movement over time. Make sure to follow the manufacturer's instructions for the best results. Once you've secured the edges, you'll not only enjoy a beautiful finish but also the peace of mind that comes with a well-installed floor. This step is vital for achieving a long-lasting and appealing flooring solution.
Clean and Maintain
Although maintaining your engineered hardwood flooring might seem challenging, it's quite straightforward with the right approach. Here are some essential cleaning techniques and maintenance tips to keep your floors looking their best:
- Sweep or Vacuum Regularly: Remove dirt and debris to prevent scratches.
- Damp Mop: Use a microfiber mop with a suitable cleaner to avoid water damage.
- Wipe Up Spills Immediately: Quick action helps prevent stains and warping.
- Use Furniture Pads: Protect your floors from scratches by placing pads under furniture legs.
Frequently Asked Questions
Can I Install Engineered Hardwood Over Existing Flooring?
Yes, you can install engineered hardwood over existing flooring, but it's important to prepare the floor properly. Make certain the surface is clean, level, and dry. If you're using floating installation methods, guarantee there's enough underlayment for support. If the existing floor is too uneven or soft, you might need to think about removing it. Taking these steps will help you achieve a durable and attractive new floor that fits your lifestyle.
What Is the Best Way to Clean Engineered Hardwood Floors?
To keep your engineered hardwood floors looking great, use gentle cleaning solutions. A mixture of warm water and a few drops of pH-balanced cleaner works well. Avoid harsh chemicals that can damage the finish. Regular sweeping or vacuuming helps remove dirt and debris, too. For maintenance tips, consider placing mats at entryways and using furniture pads to prevent scratches. With these simple steps, you'll enjoy beautiful floors for years to come!
How Long Does Engineered Hardwood Last?
Engineered hardwood typically lasts between 20 to 30 years, depending on the quality and maintenance. To maximize lifespan expectations, you should follow some simple maintenance tips, like regular sweeping and using a damp mop for cleaning. Avoid harsh chemicals and excessive water, which can damage the surface. With proper care, you'll enjoy your flooring for years to come, giving you the freedom to focus on what truly matters in your living space.
Is Engineered Hardwood Suitable for Basements?
When it comes to basements, think of engineered hardwood as a sturdy ship sailing through moisture's stormy seas. It's designed with moisture resistance, making it suitable for lower levels. However, before you plunge in, remember these installation tips: always acclimate the flooring, use a vapor barrier, and guarantee proper ventilation. By taking these precautions, you'll enjoy a beautiful, durable floor that stands strong against the challenges of basement living.
Can I Refinish Engineered Hardwood Flooring?
Yes, you can refinish engineered hardwood flooring, but it depends on the thickness of the veneer. If it's thick enough, refinishing techniques like sanding and applying a new finish can restore its beauty. For proper maintenance, avoid excessive moisture and use gentle cleaners. Regularly check for scratches and wear to determine when refinishing might be needed. Staying proactive will keep your floors looking great and extend their lifespan, giving you the freedom to enjoy your space.

