To lay laminate flooring on concrete, start by gathering essential tools like a jigsaw, measuring tape, and leveling compound. Clean the concrete surface thoroughly, removing dirt and debris, then check for cracks and low spots, filling them with a leveling compound. Next, install a proper underlayment to provide moisture protection and cushioning. Measure and cut your laminate planks accurately, ensuring neat edges. Lay the planks using a floating method, staggering the seams, and leaving expansion gaps around the perimeter. Finally, secure the planks, and you're done! For ideal results, there's even more vital information to take into account.
Gather Your Tools and Materials
Before you begin laying laminate flooring, it's essential to gather the right tools and materials. Start with your tool selection: you'll need a tapping block, pull bar, and a saw—either a jigsaw or miter saw works well. Don't forget a measuring tape, square, and a level to guarantee precision.
Next, focus on material types. Choose high-quality laminate planks that suit your aesthetic, and be mindful of the thickness, as it impacts durability and stability. Additionally, acquire an underlayment to provide cushioning and moisture protection. This combination of proper tools and materials will set the foundation for a successful flooring project, granting you the freedom to create a beautiful space that reflects your style. Prepare to immerse yourself in the installation with confidence!
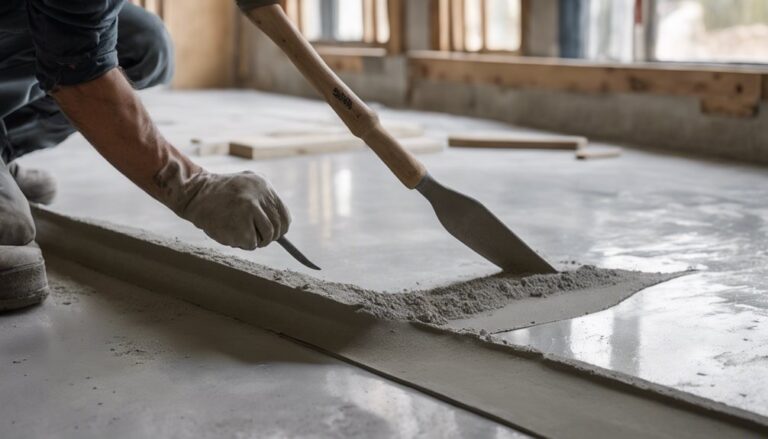
Prepare the Concrete Surface
Guaranteeing your concrete surface is properly prepared is essential for a successful laminate flooring installation. Start with thorough surface preparation by cleaning the concrete to remove debris, dust, and any oils. Next, check for cracks or low spots; these can compromise your laminate. Concrete leveling may be necessary, filling in any imperfections with a self-leveling compound to create a smooth, even base.
| Action | Importance | Result |
|---|---|---|
| Clean the surface | Prevents moisture | Guarantees adhesion |
| Check for cracks | Avoids future damage | Maintains integrity |
| Level imperfections | Smooth installation | Flawless appearance |
Taking these steps will lead to a more durable and visually appealing laminate floor.
Install Underlayment
Installing underlayment is a critical step in the laminate flooring process that directly influences the overall performance and comfort of your floor. Choosing the right underlayment types is essential, especially when working with concrete, as it can provide sound insulation and moisture protection.
- Foam Underlayment: Lightweight and easy to install, it offers basic sound absorption.
- Cork Underlayment: Provides excellent thermal insulation and sound dampening.
- Moisture Barrier Underlayment: Essential for concrete floors, preventing moisture damage.
Ensure you roll out the underlayment across the entire area, overlapping seams and sealing them with tape to create an effective moisture barrier. Once installed correctly, you'll notice a difference in comfort and performance, giving you the freedom to enjoy your new laminate flooring.
Measure and Cut Laminate Planks
Measuring and cutting laminate planks accurately is essential for achieving a seamless and professional-looking floor. Start by using precise measuring techniques; a tape measure and square can help guarantee your measurements are accurate. Once you've measured, mark the planks clearly.
| Measurement | Tool Used | Notes |
|---|---|---|
| Width | Tape Measure | Measure from wall to wall |
| Length | Square | Guarantee straight cuts |
| Angle | Protractor | For corners and edges |
For cutting tools, a miter saw or laminate cutter is best for clean edges. Always wear safety gear and double-check your measurements before cutting to minimize waste and guarantee a perfect fit.
Begin Laying the Laminate
Once you've prepared your workspace and gathered your materials, you're ready to begin laying the laminate. Start by choosing your laying techniques; you can opt for the floating method or glue-down approach. Here are some essential installation tips to keep in mind:
- Always stagger the seams of the planks for a more natural look.
- Leave a gap around the perimeter to allow for expansion.
- Use spacers to maintain consistent distance from the walls.
Begin in a corner and work your way across the room, ensuring each plank clicks securely into place. Pay attention to alignment and be vigilant about gaps. A careful approach now will lead to a beautiful, seamless finish that allows you the freedom to enjoy your new flooring.
Secure and Fit the Planks
To secure and fit the planks effectively, you need to select the right underlayment, ensuring it suits your flooring type and provides necessary cushioning. Align the planks correctly during installation to maintain a seamless appearance and prevent gaps. Don't forget to use spacers to allow for expansion along the walls, accommodating any changes in humidity and temperature.
Choose the Right Underlayment
Selecting the right underlayment is essential for ensuring your laminate flooring performs at its best and lasts for years. You'll want to evaluate various underlayment types, as each serves a specific purpose. Here are three key factors to keep in mind:
- Sound Absorption: Look for options that minimize noise and create a quieter living space.
- Moisture Barrier: A proper underlayment will protect your laminate from moisture damage, especially important on concrete.
- Thermal Insulation: Some underlayment types provide added warmth, making your floor more comfortable.
Align Planks Correctly
Aligning the planks correctly is essential for achieving a seamless and professional-looking finish in your laminate flooring installation. Start by employing plank alignment techniques, ensuring each plank fits snugly against its neighbor. Use proper staggering methods to enhance stability and aesthetics; stagger joints by at least 12 inches.
Here's a visual representation:
| Plank 1 | Plank 2 | Plank 3 |
|---|---|---|
| A1 | A2 | A3 |
| B1 | B2 | B3 |
| C1 | C2 | C3 |
As you lay each plank, double-check the alignment and edges. This careful attention to detail will yield a beautiful, durable floor that complements your space.
Use Spacers for Expansion
Using spacers is vital for guaranteeing proper expansion and contraction of laminate flooring. Without them, your beautiful flooring could buckle or warp over time. Here's what you need to keep in mind:
- Maintain proper expansion gaps around walls and fixed objects.
- Position spacers evenly to create uniform space for movement.
- Remove spacers only after securing all planks in place.
When laying your laminate, make sure that spacer placement is consistent along the perimeter. Aim for a gap of at least 1/4 inch to allow for natural expansion. This small step is essential for the longevity and performance of your flooring. Embrace the freedom of a well-installed laminate floor by following these guidelines, making certain you enjoy it for years to come.
Finish and Clean the Area
Once you've secured and fitted the planks, it's crucial to remove any debris thoroughly from the area. Inspect the surface condition carefully to confirm there are no remaining particles that could affect the flooring's integrity. Afterward, apply suitable cleaning solutions to prepare the surface for use and maintain its appearance.
Remove Debris Thoroughly
Before you begin laying your laminate flooring, it's important to remove all debris thoroughly from the area. Proper debris removal guarantees surface cleanliness, preventing any bumps or imperfections in your finished floor. Here's what you should focus on:
- Clear away dust and dirt using a vacuum.
- Remove any nails or screws that may have been left behind.
- Wipe down the surface with a damp cloth to eliminate fine particles.
Taking these steps helps create a smooth, clean base for your laminate. Remember, neglecting this part can lead to uneven flooring and potential damage over time. So, invest the time now to guarantee a flawless installation and enjoy the freedom that comes with a beautifully finished floor.
Inspect Surface Condition
After you've cleared the area of debris, it's crucial to inspect the surface condition to confirm it's suitable for laminate installation. Start by examining for any surface imperfections like cracks, bumps, or uneven spots that could affect the laminate's performance. Use a level to check for flatness; ideally, the surface should not deviate more than 1/8 inch over a 10-foot span. Next, conduct a moisture assessment; laminate flooring can warp or buckle if installed over a damp surface. Use a moisture meter to verify the concrete's moisture content is within acceptable limits, typically below 4%. Address any identified issues before proceeding, as a solid foundation will lead to a successful laminate installation.
Apply Cleaning Solutions
Clean the surface thoroughly to confirm ideal adhesion and performance of your laminate flooring. This step is essential for guaranteeing longevity and ease of floor maintenance. Use suitable cleaning products to eliminate dust, dirt, and debris.
Consider these tips:
- Choose a pH-balanced cleaner to avoid damaging the concrete.
- Use a microfiber mop for effective dirt removal without leaving residue.
- Rinse the area with clean water to confirm no cleaning product remains.
Once the surface is clean, allow it to dry completely before proceeding with your laminate installation. A well-prepared surface not only enhances adhesion but also contributes to the overall appearance and durability of your new flooring. Your attention to detail here will pay off in the long run.
Frequently Asked Questions
Can Laminate Flooring Be Installed Over Existing Carpet?
You can't install laminate flooring over existing carpet. Carpet removal is crucial for a proper installation, as it can lead to significant installation challenges. The carpet's cushioning can prevent the laminate from locking in place, causing uneven surfaces and potential damage. Additionally, moisture can get trapped, leading to mold issues. For the best results and longevity of your flooring, always start with a clean, level surface to guarantee a solid foundation.
How Do Temperature and Humidity Affect Laminate Installation?
Temperature fluctuations and humidity levels greatly impact laminate installation. Ideally, you should keep the room's temperature between 60°F and 80°F. If it's too cold or hot, the laminate may expand or contract, leading to gaps. High humidity can cause the material to swell, while low humidity may lead to shrinkage. It's essential to acclimate the laminate planks in the installation area for at least 48 hours to mitigate these effects and guarantee a durable result.
What Type of Laminate Is Best for High-Moisture Areas?
When considering laminate for high-moisture areas, you'll want to choose water-resistant options specifically designed for such environments. Look for products with built-in moisture barriers, as they protect the core from damage due to humidity and spills. Brands often offer laminate that's rated for bathrooms and kitchens; these typically feature thicker wear layers and enhanced sealing. Always guarantee proper acclimation and installation techniques to maintain the integrity of your flooring in these challenging conditions.
How Long Does Laminate Flooring Typically Last?
You might be wondering just how long laminate flooring lasts. Typically, laminate durability ranges from 15 to 25 years, depending on quality and maintenance. Factors like foot traffic and humidity can greatly influence flooring lifespan. Higher-grade laminates usually outperform their lower counterparts, offering better resistance to wear and tear. To guarantee longevity, it's essential to follow proper care guidelines. So, investing wisely can lead to a beautiful, lasting floor you'll enjoy for years.
Can I Install Laminate Flooring DIY or Should I Hire a Professional?
You can definitely choose between DIY installation and professional installation for your laminate flooring. If you're handy and have the right tools, a DIY approach can save you money and give you a sense of accomplishment. However, if you're unsure about your skills or want a flawless finish, hiring a professional might be the better route. Weigh the costs, your experience, and the time you can dedicate to determine the best option for you.