To lift floor tiles, start by evaluating their condition; look for cracks or loose edges that indicate easier removal. Gather your tools: a hammer, chisel, utility knife, and pry bar. Clear the area of furniture, guaranteeing a safe workspace. Remove baseboards carefully using a utility knife and pry bar. Score the grout lines with your knife to prevent tile damage. For stubborn tiles, a heat gun can help loosen adhesive. Use your pry bar to gently lift the tiles, working slowly to maintain their integrity. There's more to this process, helping you secure success with every step.
Assessing Your Floor Tiles
Have you ever wondered how to determine if your floor tiles are ready to be lifted? Start by evaluating the tile types and floor conditions. Look for loose tiles or any signs of cracking. If the grout is crumbling or the tiles feel uneven, it's a clear indication that they may be compromised. Check for moisture; dampness can weaken adhesive bonds, making lifting easier but may also lead to further damage. Tap on the tiles; a hollow sound often signals detachment. For ceramic or porcelain tiles, inspect the edges for chips or wear. If you find any of these issues, it's time to contemplate lifting them. Remember, understanding these factors will empower you to make informed decisions.
Gathering Essential Tools
Before you start lifting floor tiles, it's crucial to gather the right tools to guarantee the process goes smoothly. First, identify the tile types you're dealing with, as different materials like ceramic or vinyl may require specific removal techniques. You'll need a sturdy chisel, a hammer for tapping, and a utility knife for cutting any adhesive. A pry bar can help leverage those stubborn tiles, while a floor scraper is great for removing remnants. Don't forget safety gear like gloves and goggles to protect yourself during the process. Finally, a dust mask is wise to have on hand, especially if you're working with older tiles that may contain harmful substances. With these tools ready, you'll be set for a successful tile removal.
Preparing the Workspace
To guarantee a smooth tile removal process, it's important to prepare your workspace effectively. Start by clearing the area of any furniture and obstacles. This guarantees workspace organization, giving you ample room to maneuver. Next, lay down protective coverings to shield your surfaces from damage.
Here's a simple guide for workspace preparation:
| Step | Action | Purpose |
|---|---|---|
| Clear the area | Remove furniture and items | Enhance mobility |
| Protect surfaces | Use drop cloths or plastic | Prevent scratches |
| Gather tools | Keep them within reach | Improve efficiency |
| Ventilation | Open windows or use fans | guarantee comfort |
Removing Baseboards and Trim
Before you can lift those floor tiles, you'll need to remove the baseboards and trim carefully. Gather your tools, like a pry bar and utility knife, and follow a step-by-step process to avoid damage. I'll share some tips to help you preserve the trim for reinstallation later.
Tools Needed for Removal
Removing baseboards and trim is an essential step in lifting floor tiles, and having the right tools at your side makes the job easier. Here's a list of tools you'll need for effective floor preparation:
| Tool | Purpose | Tips |
|---|---|---|
| Pry Bar | Remove trim without damage | Use gently to avoid splintering |
| Utility Knife | Cut caulk or adhesive | Make sure it's sharp for clean cuts |
| Hammer | Assist pry bar in lifting | Tap lightly to prevent damage |
| Stud Finder | Locate wall studs | Helps avoid damaging walls |
| Safety Goggles | Protect your eyes | Always wear during removal |
With these tools, you'll be ready to tackle various tile types and get your project underway efficiently.
Step-by-Step Process
As you prepare to lift floor tiles, carefully detaching the baseboards and trim is essential for a smooth removal process. Start by using a utility knife to score along the edges where the trim meets the wall, ensuring you don't damage the drywall. Then, with a pry bar or flathead screwdriver, gently lift the baseboards away from the wall, working from one end to the other. If you've got adhesive, take your time to avoid breaking the trim pieces. Keep in mind the different tile types you're working with, as this can affect your floor preparation. Properly removing the trim not only makes lifting tiles easier but also preserves the integrity of the surrounding areas for a clean finish.
Tips for Preservation
To guarantee your baseboards and trim remain intact during the tile removal process, it is crucial to take a few careful steps. Start by gently prying the baseboards away from the wall using a flat pry bar, being cautious not to damage the wood. If your baseboards are glued down, identify the adhesive types used, as this will dictate your removal approach. For caulked edges, use a utility knife to cut through the caulk before prying. Consider employing tile maintenance strategies, like labeling each piece to facilitate reinstallation later. Finally, store your baseboards in a safe place, ensuring they're free from moisture. By following these tips, you'll preserve your trim and simplify your flooring project.
Loosening the Tiles
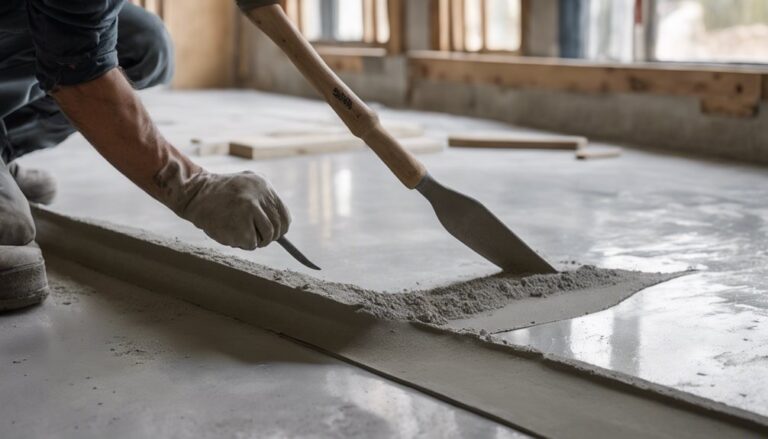
Before you can lift the floor tiles, you'll need to effectively loosen them from the adhesive beneath. Start by identifying the tile types you're working with, as different materials may require specific removal methods. For ceramic or porcelain tiles, a utility knife can help cut through the grout lines. For vinyl tiles, use a putty knife to pry up the edges. If the adhesive is particularly stubborn, consider using a heat gun to soften it; just be careful not to damage the tiles. If you're facing a cement-based adhesive, a chisel may be necessary. Remember, patience is key—work slowly and steadily to avoid breaking the tiles. Once they're loosened, you'll be ready for the next step!
Lifting the Tiles
Gently lift the loosened tiles using a flat pry bar or a putty knife, inserting the tool beneath the edge of each tile. For different tile types, you may need to adjust your lifting methods. For ceramic tiles, leverage the pry bar carefully to avoid cracking. With vinyl tiles, a putty knife often works best, allowing you to slide under the tile with minimal damage. As you lift, keep an eye on the surrounding tiles to prevent them from shifting. Work slowly and methodically, lifting each tile at a slight angle to maintain its integrity. If a tile resists, check for any adhesive that might still be holding it in place, but remember, you'll deal with that in the next step.
Dealing With Adhesive Residue
Once you've successfully lifted the tiles, you'll likely encounter adhesive residue that needs to be addressed. Different adhesive types, like thin-set mortar or mastic, can require specific removal techniques. For water-soluble adhesives, a simple solution of warm water and soap can work wonders—apply it, let it soak, and scrape gently with a putty knife. For tougher residues, consider using a heat gun to soften the adhesive before scraping. If you're dealing with epoxy-based adhesives, a commercial adhesive remover may be necessary; just follow the manufacturer's instructions. Always wear gloves and guarantee proper ventilation. Remember, patience is key—taking your time will help you achieve a clean surface, ready for whatever you plan next.
Repairing the Subfloor
After you've tackled the adhesive residue, it's time to assess and repair the subfloor beneath the tiles. Begin with a thorough subfloor inspection—look for any signs of water damage, warping, or rotting. If you encounter soft spots, it's essential to replace those areas with appropriate subfloor materials, like plywood or oriented strand board (OSB). Cut out the damaged sections, ensuring you've got a clean edge for the new material. Secure the new pieces with screws, ensuring they're flush with the surrounding surface. Once the repairs are complete, check for levelness; any unevenness can lead to problems when you reinstall tiles. With a solid subfloor, you're now ready to move on to the next steps in your flooring project.
Safety Precautions
Before you start lifting floor tiles, it's crucial to prioritize safety to protect yourself from potential hazards. Begin by wearing the right safety gear, including gloves, safety goggles, and a dust mask. These items help shield you from sharp edges, debris, and dust that can cause injury or irritation.
Make sure your workspace is clear of obstacles to prevent slips and falls, and use proper lifting techniques to avoid straining your back. If you're working with older tiles, be aware that they may contain hazardous materials like asbestos, so check local guidelines for safe handling. Implementing these precautions is key to injury prevention, allowing you to work freely and confidently as you tackle your flooring project.
Tips for a Smooth Process
To guarantee a smooth process when lifting floor tiles, start by gathering all the necessary tools you'll need, like a chisel, hammer, and safety goggles. Next, prepare the area by clearing furniture and covering any vents to minimize dust. Finally, use proper techniques, such as working in small sections, to make the removal easier and more efficient.
Gather Necessary Tools
While gathering the necessary tools may seem like a minor step, it's essential for ensuring a smooth tile-lifting process. Start by collecting a floor scraper or chisel, as these will help with different tile types. A pry bar can be invaluable for lifting stubborn tiles. Don't forget protective gear—gloves and goggles—to keep yourself safe. Depending on your removal techniques, you might also need a heat gun to soften adhesive or a hammer for stubborn spots. A utility knife will aid in cutting through any remaining grout. Finally, have a sturdy bucket handy to collect debris. With the right tools in hand, you'll be well-prepared to tackle your tile-lifting project with confidence.
Prepare the Area
Preparing the area is essential for a smooth tile-lifting process, as a well-organized workspace minimizes potential hazards and distractions. Start by clearing the floor of furniture, rugs, and any obstructions. Make certain to cover any vents or openings to prevent debris from entering your home. Next, identify the tile types you'll be working with, as certain materials may require specific handling. For floor preparation, ascertain the surface is clean and dry. You might want to lay down a drop cloth to catch any stray debris during the lifting process. Finally, make sure you have ample lighting, so you can see what you're doing clearly. This careful preparation sets the stage for a successful tile-lifting project.
Use Proper Techniques
Start by evaluating the condition of the tiles before attempting to lift them. Check for cracks, loose edges, or signs of damage. This'll help you decide the best approach for tile lifting. Use a utility knife to carefully score the grout around the tiles, which aids in a clean removal. Next, utilize a chisel and hammer to gently pry up a corner of the tile. Once you've lifted a corner, slide your chisel underneath and work your way around, applying even pressure. If you encounter stubborn tiles, a heat gun can soften adhesive for easier removal. Remember, proper floor preparation guarantees minimal damage to the subfloor. Take your time, and enjoy the process of transforming your space!
Frequently Asked Questions
Can I Lift Tiles Without Damaging Them for Reuse?
Yes, you can lift tiles without damaging them for reuse. Start by using tile removal techniques like scoring the grout around the tiles. Then, gently pry them up with a chisel or putty knife, applying even pressure. To enhance your success, consider tile preservation methods such as heating the tiles slightly to loosen the adhesive. Always work slowly and carefully, so you maintain the integrity of the tiles for future projects.
What Types of Floor Tiles Are Easiest to Remove?
When considering which floor tiles are easiest to remove, ceramic tiles and vinyl tiles stand out. Vinyl tiles, especially peel-and-stick varieties, can often be lifted without much hassle, making them a great option if you want to minimize damage. On the other hand, ceramic tiles might require more effort, but if they're not glued down too firmly, you might still manage to remove them with some patience and the right tools.
How Long Does the Tile Lifting Process Usually Take?
The time it takes for tile removal can vary considerably based on the tile type and the techniques you use. Generally, you can expect the process to take anywhere from a couple of hours to a full day. If you're using efficient tile removal techniques, like a heat gun or a chisel, you'll save time. Always estimate your time realistically, allowing for any unexpected challenges that might arise during the removal.
Should I Hire a Professional for This Task?
Deciding whether to hire a professional comes down to cost considerations and your comfort level with DIY tasks. If you're handy and want to save money, consider researching some DIY tips first. However, if you're unsure or the job seems overwhelming, it might be worth investing in a pro. They'll have the right tools and experience, ensuring the job's done efficiently and correctly, which can ultimately save you time and hassle.
What Are the Signs of Water Damage Under the Tiles?
When you're checking for water damage under your tiles, look for water stains, mold growth, and any warped or buckled tiles. If you notice discoloration or a musty smell, it's a sign that moisture's trapped beneath. You might also find loose tiles or grout that's crumbling. Catching these signs early can save you from bigger issues down the line, so stay vigilant and take action if you suspect water damage.