Are you planning a home renovation and looking to elevate your space with laminate flooring? Installing laminate flooring can completely transform the look and feel of your home.
But if you want that flawless, professional finish, staggering the planks correctly is crucial. You might be wondering, “How do I stagger laminate flooring for the best results? ” You’re not alone. Many homeowners face the same challenge, but with a few simple tips, you can achieve that perfect, seamless look.
This guide will walk you through the steps to get it right, ensuring your floor not only looks stunning but also stands the test of time. Ready to master the art of staggering laminate flooring? Let’s dive in!
Choosing The Right Laminate Flooring
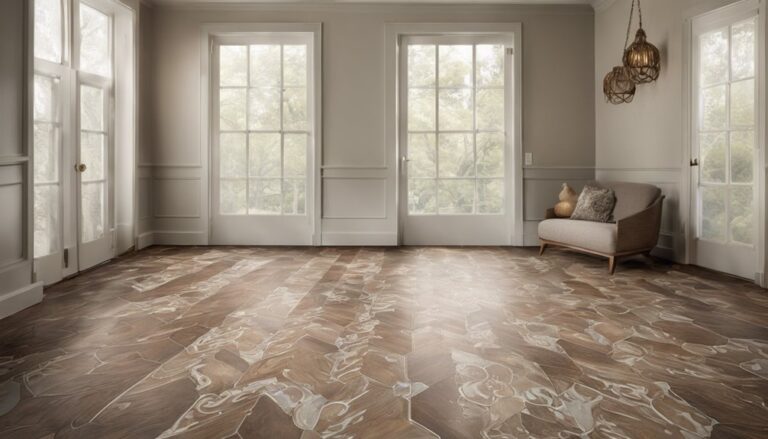
Laminate flooring comes in many types. Some are smooth. Others have a wood-like texture. Some look like stone. Each type has its own strengths. Smooth laminate is easy to clean. Textured laminate can hide scratches. Stone-like laminate adds a unique look. Choose the type that fits your needs.
Color and texture are important. Light colors make rooms look bigger. Dark colors add warmth. Textures add character. Pick a color that matches your decor. Think about how light affects the look. Test samples in your home. See how they look in different light.
Preparing The Subfloor
First, remove all the dirt and dust. Use a broom or vacuum for this. Make sure the floor is clean. This helps the laminate stick better. Next, check for any bumps or holes. Use a level tool to do this. Fill any holes with a floor patch. Sand down any high spots. A flat surface is very important. It makes the laminate last longer.
Moisture can damage the laminate. Use a moisture barrier to protect it. Lay down a plastic sheet on the floor. Overlap the edges by a few inches. Tape the seams to keep it tight. This stops water from coming up. A dry floor is a happy floor. Always check for leaks before starting.
Tools And Materials Needed
You need a tape measure to measure the floor space. A pencil helps mark the measurements. Use a utility knife to cut the laminate. A rubber mallet is for tapping the boards. You need a spacer for even gaps. A saw cuts the boards to size. A pull bar helps fit the last row.
You’ll need underlayment to protect the floor. Laminate boards are the main material. Adhesive tape helps hold things in place. Cleaning cloth keeps the work area tidy. A level ensures the floor is even. Safety goggles protect your eyes while cutting.

Planning The Layout
First, get a tape measure. Measure the length and width of the room. Write these numbers down. This helps know how much flooring you need. Keep a notebook handy. It’s important for planning. Check every corner carefully. Rooms can have odd shapes. Measure twice to make sure it’s right.
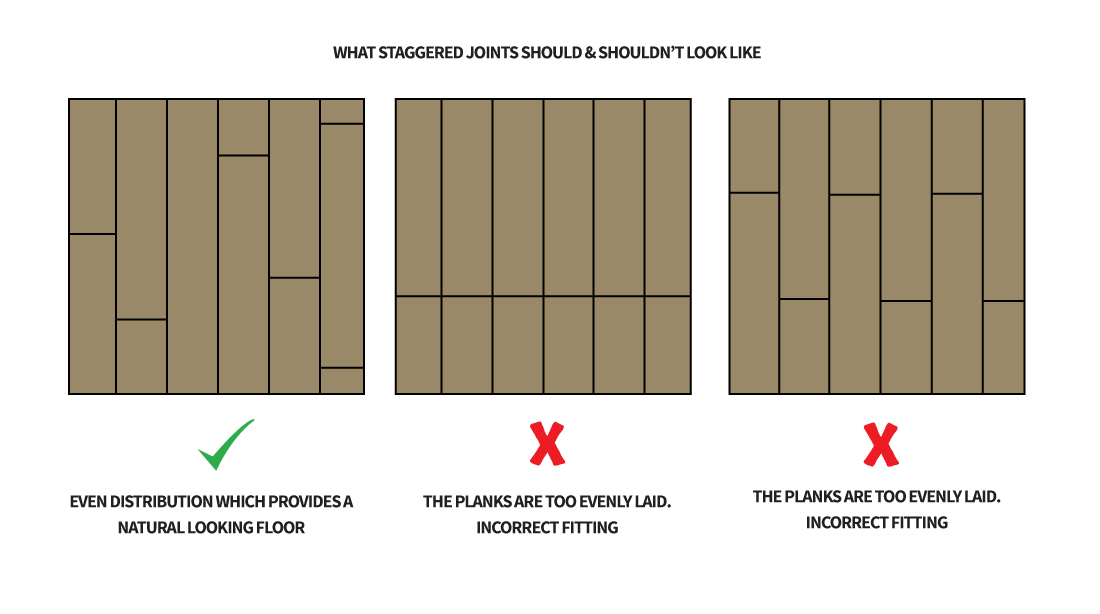
Start with a piece of paper. Draw the room’s shape. This is your layout plan. Mark doors and windows. They affect how you lay the floor. Think about where you want the planks to start. Make sure to stagger the joints. This means the ends don’t line up. This makes the floor strong. Use a pencil for easy changes.
Staggering Techniques
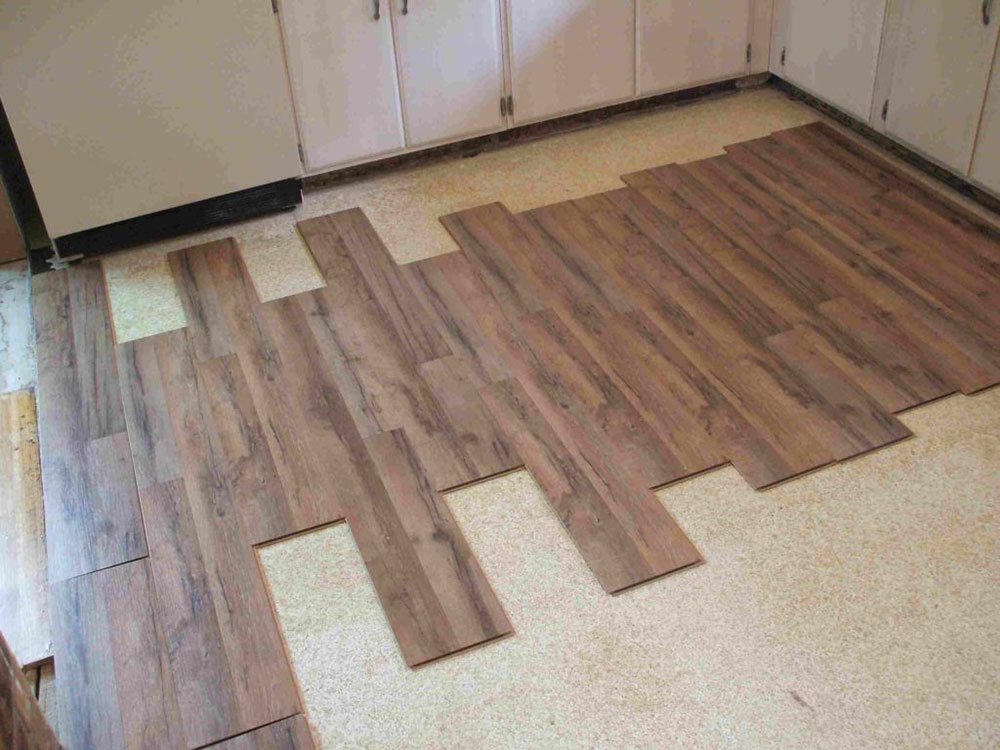
Random staggering is a simple way to lay floors. It makes the floor look natural. Boards should have different lengths. This helps in avoiding a repetitive pattern. Each board should not start at the same spot. This method makes the floor strong. It also looks nice. The floor will look like a puzzle. Each piece has its place.
Patterned staggering uses a set pattern. It is like a big jigsaw puzzle. Boards are cut to specific lengths. The pattern repeats after some rows. This method is easy to plan. It looks neat and tidy. It gives the floor a balanced look. Some patterns are stair-step or brick-like. Choose the one you like best.
Installing The First Row
Aligning the boards is very important. Start with a straight line. Use a chalk line to make it straight. Place the first board in the corner. Make sure it is tight against the wall. Leave a small gap. This gap helps with expansion.
Ensure the ends are even and not jagged. A good fit helps the next rows. If the board is crooked, it will make problems. So, check twice. Make sure it is perfect.
Securing the edges keeps the boards in place. Use spacers between the board and wall. These spacers keep the right gap. They also stop the board from moving. This is very important for a strong floor.
Finally, press down the boards. Use your hands to make them flat. No gaps should be visible. If gaps appear, adjust the board. A flat board is always best.
Continuing The Installation
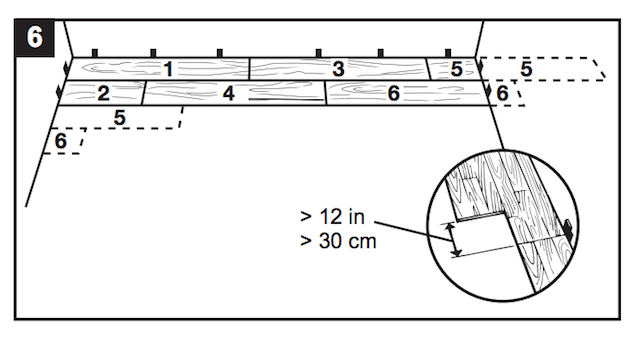
Staggering the boards is important for a strong floor. Keep the seams at least 12 inches apart. This makes the floor look nice and prevents weak spots. Use leftover pieces to start new rows. It is a smart way to save materials. Mix long and short pieces for a random look. This helps hide any mistakes.
Sometimes, obstacles like pipes or vents appear. Measure these areas carefully. Cut the laminate pieces to fit around them. Use a jigsaw for tricky cuts. It makes the job easier. Always leave space for the floor to expand. This prevents damage over time. Check each piece fits well before moving on. This saves time and effort later.
Finishing Touches
Staggering laminate flooring involves careful planning. Begin by laying the first row with full planks. Then, start the next row with a half plank, creating a staggered effect. This technique adds stability and visual appeal, ensuring a seamless finish.
Adding Moldings
Moldings make your floor look neat. They hide gaps between the floor and the wall. Choose the right molding for your floor type. Match the color with your laminate flooring. Use nails or glue to secure moldings. Make sure they fit snugly. This prevents dust and dirt from entering. Moldings also protect the edges from damage. A well-fitted molding adds beauty. It completes the room’s look. Ensure all corners are covered. This gives a polished finish.
Cleaning The Surface
Keep your laminate floor clean. Use a soft broom for dust. Sweep daily to avoid scratches. Use a damp mop for sticky stains. Do not soak the floor with water. Water can damage the laminate. Choose a cleaner made for laminate. Avoid harsh chemicals. They can fade the floor’s color. Dry the floor quickly after cleaning. This keeps it shiny and new. Clean floors last longer. A tidy floor feels good to walk on.
Common Mistakes To Avoid
Staggering laminate flooring properly avoids alignment errors and uneven looks. Ensure varied plank lengths to prevent repetitive patterns. Avoid straight lines to achieve a natural appearance and enhance durability.
Ignoring Expansion Gaps
Laminate flooring needs space to expand. Without expansion gaps, the floor can buckle. Always leave a small gap between the floor and the wall. This gap allows the floor to breathe. Too tight and the floor might crack. Ensure the gap is consistent all around. Use spacers to keep the gap even. It’s crucial for maintaining a stable floor.
Incorrect Board Alignment
Proper board alignment is key. Misaligned boards cause uneven surfaces. This can lead to tripping and damage. Check each board’s alignment carefully. Use a level tool for accuracy. If boards are not straight, fix them. Alignment affects the look and safety of the floor. Keeping boards aligned ensures a smooth finish.
Maintenance Tips
Clean floors with a soft cloth or mop. Use warm water and mild soap. Avoid harsh chemicals that can damage the surface. Regular cleaning keeps floors shiny and fresh. Wipe spills immediately to prevent stains. Dirt can scratch the surface. Vacuum regularly to remove dust and debris.
Use rugs in high traffic areas. Place mats near doors to catch dirt. Furniture pads prevent scratches from moving chairs and tables. Keep pet nails trimmed to avoid damage. Control humidity in the room to prevent warping. Avoid dragging heavy items across the floor.
Frequently Asked Questions
What Is Staggering In Laminate Flooring?
Staggering in laminate flooring refers to arranging planks in a way that avoids lining up seams. This technique enhances the visual appeal and structural integrity. Proper staggering prevents weak spots and offers a more natural look, mimicking real wood floors.
Why Stagger Laminate Flooring Planks?
Staggering laminate flooring planks enhances aesthetics and durability. It prevents seams from aligning, reducing weak spots. This technique mimics natural wood patterns, offering a more authentic appearance. Proper staggering also ensures better floor stability and minimizes potential damage.
How Do I Start Staggering Laminate Flooring?
Start staggering by laying the first row with full planks. Begin the second row with a plank cut in half. Continue alternating lengths for subsequent rows. This pattern avoids aligning seams, ensuring both aesthetic appeal and structural integrity for your flooring.
Can Improper Staggering Affect Floor Durability?
Yes, improper staggering can affect floor durability. Aligning seams weakens structural integrity, leading to potential damage. Correct staggering distributes stress evenly, enhancing stability. It’s crucial to follow recommended staggering techniques to ensure a long-lasting, visually appealing floor.
Conclusion
Staggering laminate flooring adds strength and appeal to your floor. Remember to measure twice before cutting each piece. Use spacers for even gaps and align seams carefully. This helps avoid future issues like buckling. Practice patience; take your time to ensure a smooth finish.
With these tips, your laminate floor will look great and last longer. Enjoy the beauty and durability of your new flooring. Keep these steps in mind for future projects. Your floor can become a wonderful part of your home. Happy installing!