To install geometric tile patterns, start by selecting colors and designs that vibe with your space. Gather essential tools like a tile cutter, notched trowel, and safety gear. Prep your surface by cleaning and leveling it for solid adhesion. Measure and map out your layout with precision to visualize the final look. Mix your adhesive according to instructions, then apply it in sections as you lay tiles, ensuring to check alignment continuously. Once set, grout the tiles and clean any excess. Finally, seal your masterpiece for durability. Stick around, and you'll uncover even more tips for perfecting your installation.
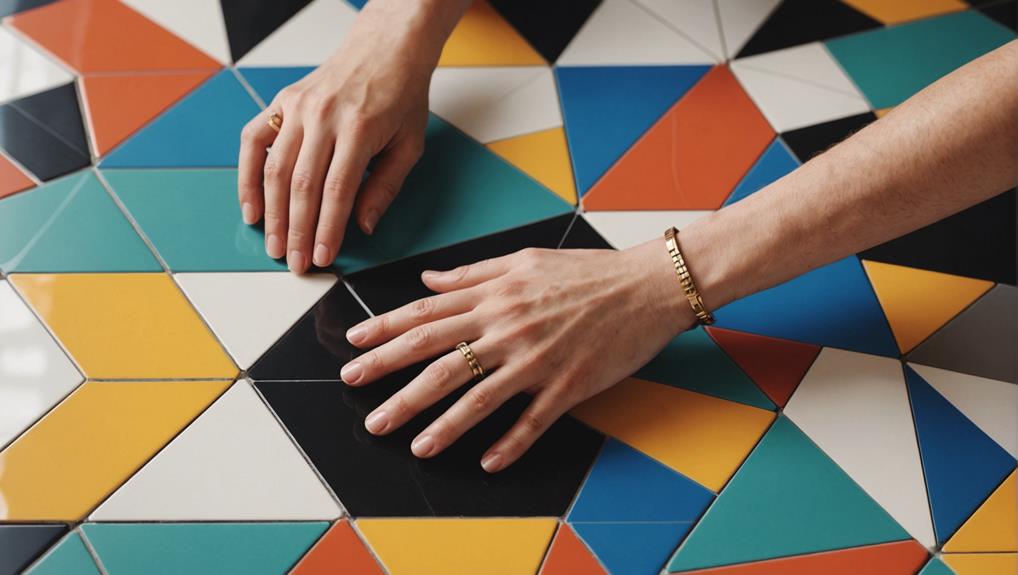
Choose Your Tile Design
Choosing your tile design is like selecting the perfect canvas for your artistic expression. It's crucial to take the time to explore tile color, as this will set the mood for your space. Do you prefer vibrant hues that pop, or softer shades that create a calming atmosphere? Your choice can greatly influence aesthetics and functionality.
When diving into pattern selection, consider the geometric styles that resonate with you. These can range from classic chevrons to modern hexagons. Each shape offers unique creative combinations that can transform your room into a visual masterpiece. Remember, the arrangement can enhance safety as well; ensuring tiles are laid in a non-slip manner can prevent accidents.
Don't overlook design inspiration. Explore current trend analysis to see what's popular but also reflect on your personal preferences. If you're drawn to vintage looks or minimalist designs, let that guide your decision. Balancing these factors with aesthetic considerations will lead you toward a harmonious design.
As you evaluate your options, think about how each choice will affect the overall function of the space. Will darker tile colors make a small room feel cramped, or will they add depth?
Ultimately, your tile design should not only be visually appealing but also practical and safe for everyday use. Embrace the process and enjoy the journey of creating a space that truly reflects your style and meets your needs.
Gather Necessary Tools
Once you've settled on a geometric tile design that resonates with your style, it's time to gather the necessary tools for installation. Confirming you have the right equipment is vital for a successful project and your safety. Start with a tile cutter or wet saw, depending on the tile types you've chosen. If you're working with ceramic or porcelain, a wet saw will provide clean cuts. For softer tiles, a manual cutter should suffice.
Next, you'll need a notched trowel to apply adhesive evenly. The size of the notch will depend on your tile's dimensions; larger tiles typically require a larger notch. A level is essential to verify your tiles are installed evenly, preventing any future issues with uneven surfaces.
Don't forget safety gear! A pair of safety goggles will protect your eyes from flying debris, while gloves will keep your hands safe from sharp edges. A dust mask is also wise if you're cutting tiles indoors, as it'll protect you from inhaling dust particles.
For your grout application, a grout float will help you spread it smoothly into the joints between tiles. Finally, a sponge and bucket of water are needed for cleaning excess grout off the tile surface.
With these tools in hand, you'll be well-prepared for your geometric tile installation journey. Remember these installation tips as you set up: measure twice, cut once, and always prioritize safety!
Prepare the Surface
Preparation is the cornerstone of a successful tile installation, setting the stage for both aesthetics and functionality. To guarantee your geometric tile patterns adhere flawlessly, you must start with thorough surface cleaning. Begin by removing any dust, dirt, or debris that might compromise the bond between the tile and the substrate. Use a vacuum or a broom, followed by a damp mop to eliminate stubborn residues. If you're working with an old surface, consider using a suitable cleaner for grease or grime. Let the area dry completely before moving on.
Next, focus on surface leveling. An uneven surface can lead to cracked tiles and gapping, so it's crucial to assess the area carefully. Use a long level to identify any dips or high spots. If you find imperfections, you can use a self-leveling compound to create a smooth, even surface. Mix the compound according to the manufacturer's instructions, and pour it into low areas, spreading it evenly. Make sure to feather the edges to guarantee a seamless shift.
Once the surface is clean and level, allow any compounds or adhesives to cure as per the guidelines. Remember, patience here pays off. When you've completed these steps, you'll have a strong foundation for your geometric tile patterns, guaranteeing both beauty and durability in your installation. Always prioritize safety by wearing appropriate gear, and don't hesitate to seek professional help if needed.
Measure and Plan Layout
With a solid and level surface ready for installation, the next step involves careful measurement and layout planning. This stage is essential for guaranteeing the geometric tile pattern you envision comes to life seamlessly. Begin by determining the tile dimensions, as these will guide your entire layout. Measure the area where tiles will be installed, marking the dimensions on the floor with a chalk line or pencil.
To visualize your pattern effectively, consider creating a mock-up using paper or cardboard cutouts of your tiles. This not only helps you see how the design flows but also allows you to make adjustments before committing. Take your time to visualize the overall aesthetic; it's your space, after all!
Here's a quick checklist to keep in mind while measuring and planning:
- Accuracy: Precision in your measurements sets the foundation for success.
- Pattern Consistency: Verify the pattern is uniform throughout the layout.
- Visual Balance: Aim for an even distribution of colors and shapes.
- Safety First: Double-check all measurements to avoid unnecessary cuts.
- Flexibility: Be open to slight changes for the best visual result.
Once you've mapped out your layout, confirm that everything aligns with your initial vision. With a solid plan in place, you'll feel confident moving on to the next phase of installation, knowing you've set the stage for a stunning tiled masterpiece.
Mix and Apply Adhesive
It's time to get your hands dirty and mix up some adhesive for your geometric tile installation. Choosing the right adhesive type is essential, as it guarantees your tiles not only stick but also withstand the test of time. For most indoor projects, thin-set mortar is a popular choice due to its versatility and strong bond. If you're working outdoors or in a moist area, consider using a modified thin-set or an epoxy adhesive, which provide added moisture resistance.
Before you start mixing, make certain you're wearing safety goggles and a mask to protect against dust and fumes. Follow the manufacturer's instructions for the correct water-to-adhesive ratio. In a clean bucket, pour the dry adhesive, then add water gradually while mixing with a drill and paddle attachment. You're aiming for a smooth, lump-free consistency—think of pancake batter but a bit thicker.
Once the adhesive is mixed, let it slake for about 10 minutes before re-stirring. This waiting period allows the adhesive to hydrate properly, enhancing its strength.
When you apply the adhesive, use a notched trowel for even distribution. Hold the trowel at a 45-degree angle and apply the adhesive in straight lines, ensuring you create ridges that help the tiles grip. Remember to cover only a small area at a time to prevent the adhesive from drying out before you lay your tiles. With the right adhesive and application techniques, you'll guarantee a solid foundation for your stunning geometric patterns.
Begin Laying Tiles
Now that your adhesive is ready, it's time to plunge into laying those geometric tiles with precision and flair. Start by selecting a reference point on your surface, such as the center, to guarantee your pattern radiates evenly. Use a chalk line or laser level to mark your starting grid; this'll help you maintain straight lines and a balanced layout.
As you begin, employ effective tile laying techniques. Apply adhesive to a manageable section of the surface, using a notched trowel to create consistent ridges that will enhance adhesion. Carefully press your first tile into place, making sure it aligns with your reference marks.
Follow these essential geometric design tips to keep your layout cohesive:
- Visual Harmony: Choose colors and shapes that complement each other, creating a stunning visual impact.
- Spacing Matters: Use spacers between tiles to guarantee even grout lines, enhancing the overall aesthetic.
- Check Alignment: Periodically step back to assess your progress; this'll help you catch any misalignments early.
- Stay Clean: Wipe away any excess adhesive promptly to avoid messy grout lines later.
- Be Patient: Allow each section of tiles to set before moving on; rushing can lead to mistakes.
Cut Tiles as Needed
Cutting tiles is an essential skill in achieving a flawless geometric pattern, especially when dealing with edges and corners. You'll need to guarantee that your tile shapes fit perfectly into your design, which often means making precise cuts. Before you start tile cutting, gather your tools: a tile cutter or wet saw, safety goggles, and a dust mask. Safety is paramount, so protect yourself from flying debris and dust.
When measuring, always double-check your dimensions. Use a pencil to mark your tiles where cuts are needed. For straight cuts, a manual tile cutter works well, while intricate shapes might require a wet saw for more complex angles. If you're tackling curves or unique shapes, a tile nipper can help you achieve those precise contours.
Now, let's talk about technique. For a clean cut, apply steady pressure and don't rush the process. Start by scoring the tile along your marked line, then snap it along the score. For wet saws, gently guide the tile through the blade, allowing the water to cool the tile and minimize chipping.
Grout the Tiles
Now that your tiles are perfectly cut and laid out, it's time to focus on grouting—an essential step for both aesthetics and durability. You'll need to choose the right grout for your design, mix it to the perfect consistency, and apply it with precision. Each of these factors plays a vital role in achieving that polished, professional finish you're aiming for.
Choosing the Right Grout
Choosing the right grout is essential for enhancing the beauty and durability of your geometric tile patterns. The right grout not only fills those spaces but also ties the design together, creating a stunning visual impact. When selecting grout, consider both grout types and grout color to guarantee they complement your tiles.
Here are some emotional factors to think about:
- Aesthetic Appeal: The right color can transform the entire look of your space.
- Longevity: Durable grout types resist stains and cracks, keeping your tiles looking new.
- Safety: Non-toxic, low-VOC options guarantee a healthier environment for your family.
- Ease of Maintenance: Choosing the right grout can simplify cleaning and upkeep.
- Personal Expression: Your choice reflects your unique style and taste.
Explore options like epoxy or cement-based grout, each offering different benefits. Epoxy is great for high-moisture areas, while cement is versatile for various designs. Remember, the perfect grout will accentuate your geometric patterns while providing safety and durability. So take your time, make informed choices, and watch your vision come to life!
Mixing Grout Properly
Once you've selected the perfect grout, it's time to get hands-on with mixing it to achieve the ideal consistency for your geometric tile patterns. Start by wearing appropriate safety gear—gloves and a mask—since grout dust can be irritating. Follow the manufacturer's instructions closely, as different grouts may require varying water ratios.
In a clean bucket, pour your grout powder and gradually add water, mixing with a drill and paddle attachment for an even blend. Aim for a grout consistency that's thick yet spreadable, similar to peanut butter. If it's too runny, it won't adhere properly; too thick, and it'll be challenging to work with.
As you mix, pay attention to the grout color. Some colors may darken slightly as they cure, so test a small batch on a spare tile to verify it meets your expectations. Once you achieve the right consistency and color, let the mixture sit for about 10 minutes. This allows the ingredients to fully hydrate, enhancing workability. Now you're ready to move on, confident that your grout is perfectly prepared for your geometric masterpiece!
Application Techniques Explained
Getting ready to grout your tiles can feel both exciting and intimidating, but with the right techniques, you'll have those geometric patterns looking flawless in no time. Begin by ensuring your tiles are clean and free of debris. As you apply the grout, pay close attention to design considerations and pattern symmetry to maintain that stunning visual impact.
Here are some essential tips to help you along the way:
- Use a rubber float to spread the grout evenly, filling all gaps.
- Work in small sections, so the grout doesn't dry out before you can clean it.
- Wipe excess grout off the tile surface with a damp sponge, moving diagonally to avoid pulling grout from the joints.
- Check for consistency in your grout lines; they should mirror the symmetry of your tile pattern.
- Allow proper curing time for the grout to set before walking on your new masterpiece.
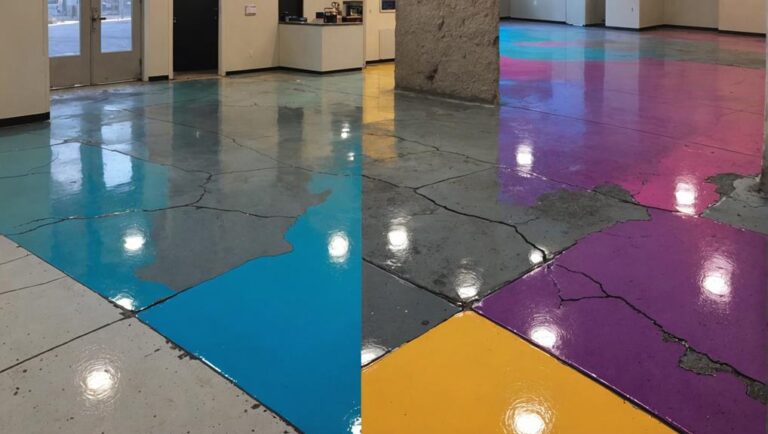
Clean and Seal Surface
Before you immerse yourself in laying down those stunning geometric tile patterns, it is vital to clean and seal the surface where they'll be installed. A clean surface guarantees that your tiles adhere properly and last longer, while effective sealing protects against moisture damage and stains. Start with thorough surface cleaning; remove any dirt, dust, grease, or existing adhesives. Use a strong, non-toxic cleaner suited for your specific substrate—whether it be concrete, wood, or drywall. A clean surface not only enhances adhesion but also contributes to the overall aesthetic of your installation.
Once you've achieved a pristine surface, it is time to apply sealing products. Choose a high-quality sealant designed for your particular tile material. If you're working with porous tiles, a penetrating sealant is recommended, as it soaks in and provides deep protection. For non-porous tiles, a surface sealant will do the trick. Apply the sealant evenly, following the manufacturer's instructions for drying times and application techniques. Remember, sealing is vital; it prevents moisture intrusion, which can lead to mold growth and structural damage.
Frequently Asked Questions
Can I Install Geometric Tiles Over Existing Flooring?
Yes, you can install geometric tiles over existing flooring, but it's essential to conduct a thorough flooring assessment first. Check for any damage or uneven surfaces that could affect adhesion. Tile preparation is important; clean the existing floor and make certain it's level. If it's in good condition, you can proceed, but remember that adding weight might impact your structure. Always prioritize safety and consult a professional if you're uncertain about the process.
What Type of Grout Works Best With Geometric Tiles?
When choosing grout for your geometric tiles, imagine a vibrant mosaic of colors complementing your design. Epoxy grout types offer superior durability, resisting stains and moisture, making it a safe choice for high-traffic areas. You can play with grout colors, selecting shades that either blend seamlessly or create striking contrasts with your tiles. This way, you not only enhance the visual appeal but also guarantee a long-lasting finish that withstands daily wear and tear.
How Do I Maintain My Geometric Tile Patterns?
To maintain your geometric tile patterns, it's crucial to adopt effective cleaning techniques. Regular sweeping and mopping with a pH-neutral cleaner will prevent dirt buildup. For added protection, consider sealant options that can shield your tiles from stains and moisture, ensuring longevity. Avoid harsh chemicals that could damage the surface. With these practices, you'll keep your tiles looking vibrant and safe for years to come, enhancing your space beautifully.
Are There Specific Tile Sizes for Geometric Patterns?
When it comes to tile sizes for geometric patterns, think of it as a delightful puzzle waiting to be solved. You'll find that various sizes create unique tile layouts, enhancing the visual appeal. Popular dimensions often include 12×12, 6×6, or even hexagonal shapes. Pattern orientation plays an essential role too; it can transform a space's feel. So, choose wisely, and embrace the art of geometry while ensuring a safe, stylish outcome.
How Do I Choose Complementary Colors for My Tile Design?
When choosing complementary colors for your tile design, consider color theory and color psychology. Aim for tile contrast that enhances design balance, creating a harmonious look. Experiment with pattern mixing to find combinations that elevate your interior aesthetics while ensuring safety in your choices. For instance, pairing bold colors with softer hues can create visual interest without overwhelming the space. Trust your instincts, and don't forget to visualize the overall effect before committing.