To lay floor tiles on concrete, start by gathering your materials, including tiles and adhesive. Clean the concrete thoroughly, checking for moisture; it should be below 4%. Repair any cracks and guarantee the surface is level. Plan your tile layout carefully using chalk lines. Apply adhesive evenly with a notched trowel, keeping an even layer. Lay the tiles, using spacers for consistent gaps, and check for alignment regularly. Once laid, allow the tiles to set, then grout and seal the floor for a finished look. There's more to explore about each step to guarantee your project's success.
Gather Your Materials
Before you begin laying floor tiles, it's crucial to gather all the necessary materials to guarantee a smooth installation process. Start by selecting your tile types; options include ceramic, porcelain, or natural stone, each offering unique benefits and aesthetics. Next, choose the right adhesive options for your specific tiles and the concrete surface. Thin-set mortar is commonly used for most tiles, while mastic may work for certain ceramic options in dry areas. Don't forget to collect essential tools like a tile cutter, trowel, and level. Having everything on hand guarantees you're not interrupted during installation, allowing you the freedom to focus on achieving a professional finish. Plan ahead, and your tiling project will go seamlessly.
Prepare the Concrete Surface
Before laying your floor tiles, you need to prepare the concrete surface properly. Start by cleaning the concrete thoroughly to remove any dirt or debris, then check for moisture levels to guarantee a stable base. Finally, repair any cracks to prevent future issues with your tile installation.
Clean the Concrete Thoroughly
To guarantee a successful tile installation, thoroughly cleaning the concrete surface is essential. Start by removing any loose debris, dirt, or dust. Use appropriate cleaning techniques such as sweeping and vacuuming. For stubborn stains, a pressure washer or concrete cleaner can be effective. After initial cleaning, verify the surface is free of oil or grease, as these can hinder adhesion.
Here's a quick reference table for effective cleaning techniques:
| Cleaning Technique | Purpose |
|---|---|
| Sweeping | Remove loose dirt and debris |
| Vacuuming | Capture fine particles |
| Pressure Washing | Remove deep-set stains |
| Concrete Cleaner | Break down oil/grease |
Following these steps verifies proper concrete preparation, setting a solid foundation for your tile installation.
Check for Moisture Levels
Once you've verified the concrete surface is clean, it's important to check for moisture levels. Start by conducting moisture testing using a reliable moisture meter. This step's essential, as excess moisture can lead to tile adhesion failure and mold growth. Aim for a moisture level below 4% for ideal results. If you find higher readings, consider implementing humidity control measures, like dehumidifiers or fans, to dry the area effectively. Wait until you achieve acceptable moisture levels before proceeding with tile installation. Remember, ensuring a dry, stable environment not only enhances the durability of your tiles but also gives you the freedom to enjoy your space without concerns about future issues. Prioritize this step to secure a successful flooring project.
Repair Any Cracks
Inspect and repair any cracks in the concrete surface before laying your floor tiles. Start with a thorough crack assessment; identify the size and depth of each crack. For minor cracks, use a concrete filler or caulk, applying it evenly to guarantee a smooth surface. For larger cracks, consider employing more robust repair techniques, such as epoxy injection or patching compounds. After applying the chosen repair material, allow it to cure fully according to the manufacturer's instructions. Once cured, sand down any raised areas to create a level surface. This preparation is essential, as it not only enhances the aesthetic appeal but also guarantees the longevity and stability of your tile installation. Proper repairs lead to a successful flooring project.
Plan Your Tile Layout
Planning your tile layout is essential for achieving a professional finish in any flooring project. Start by determining the tile patterns you want to use—whether it's straight, diagonal, or a more intricate design. Use layout tools, like a chalk line or laser level, to establish reference lines on the concrete surface. This helps you visualize the entire area and guarantees the tiles align properly. Measure the room's dimensions accurately and mark where your first tile will go, typically in the center of the space for balance. Adjust your pattern as needed to avoid narrow cuts at the edges. Taking the time to plan your layout carefully will set the foundation for a stunning tile installation.
Apply Adhesive Properly
Applying adhesive properly is essential for ensuring your tiles bond securely to the substrate. Start by selecting the right adhesive types based on your tile material and the environment. Thin-set mortar works well for most ceramic tiles, while mastic is better for areas not exposed to moisture.
Once you've chosen your adhesive, employ proper application techniques. Use a notched trowel to spread the adhesive evenly across a small section of the floor. Hold the trowel at a consistent angle to create ridges that enhance adhesion. Don't apply more adhesive than you can cover with tiles in 20-30 minutes to prevent it from drying out.
Ensure you're working systematically to maintain an even layer, allowing your tiles to set correctly and securely.
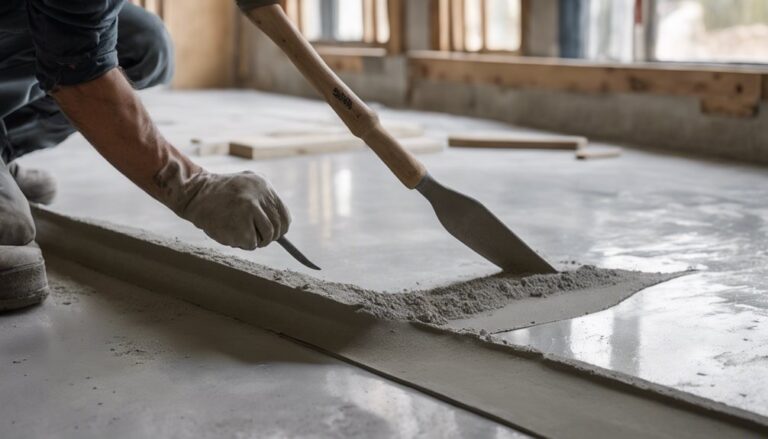
Lay the Tiles Evenly
Once you've applied the adhesive, it's time to lay the tiles evenly. Start by using tile alignment techniques, like spacers, to guarantee consistent gaps between tiles. Place the first tile in a corner, pressing down firmly to secure it into the adhesive. Use a leveling tool, such as a spirit level, to check that it's perfectly flat. For subsequent tiles, align them with the first using the spacers and adjust as necessary to maintain evenness. If you notice any tiles not leveling properly, gently lift them and reapply adhesive before repositioning. Continue this process across the entire area, checking alignment and level periodically to achieve a professional finish.
Grout the Tiles
With the tiles securely laid, it's time to grout them for a finished look and added durability. Start by selecting the appropriate grout type for your tiles—consider whether you need sanded or unsanded grout based on the joint width. Mix the grout according to the manufacturer's instructions, achieving a smooth, workable consistency.
Using a grout float, apply the grout at a 45-degree angle to fill the joints. Make sure you press the grout firmly into the gaps to avoid air pockets. Once filled, remove excess grout from the tile surface with the float. Allow the grout to set for the time specified, then clean the tiles with a damp sponge to reveal a clean finish.
Finish and Seal the Floor
After the grout has fully cured, it's essential to finish and seal the floor to enhance its appearance and protect it from moisture and stains. Start by selecting the right sealant options for your tile type—water-based or solvent-based sealants are common choices. Clean the floor thoroughly to remove any dust or debris. Apply the chosen sealant evenly using a roller or applicator, following the manufacturer's instructions for drying time.
Once sealed, consider using finishing techniques like buffing to achieve a polished look or applying a matte finish for a more natural appearance. Allow the sealant to cure as recommended, ensuring your new tiles are well-protected and visually appealing for years to come.
Frequently Asked Questions
Can I Tile Over Existing Concrete Without Removing It?
You can definitely tile over existing concrete without removing it, but it's not a walk in the park! The pros include saving time and effort, while the cons involve potential issues with adhesion and uneven surfaces. For successful installation, make certain the concrete is clean, dry, and free of cracks. Use a quality thin-set mortar and consider applying a primer for better bonding. Follow these tips, and you'll enjoy a fresh look without the hassle!
What Type of Tile Is Best for Concrete Floors?
When considering the best type of tile for concrete floors, both ceramic and porcelain tiles are excellent choices. Ceramic tiles offer affordability and a variety of designs, making them versatile for many spaces. On the other hand, porcelain tiles are denser, more durable, and resistant to moisture, which is ideal for high-traffic areas. Ultimately, it depends on your specific needs, but either option will provide a stylish and lasting finish for your concrete floors.
How Long Does It Take for Tile Adhesive to Dry?
They say, "Good things come to those who wait," and that applies to tile adhesive drying times. Typically, thin-set adhesives take about 24 hours to set, while faster-curing options might dry in 4-6 hours. However, it's essential to follow the manufacturer's recommendations, as drying times can vary depending on adhesive types and environmental conditions. Make sure to allow adequate time before walking on or grouting your tiles for the best results.
Do I Need to Seal the Grout After Application?
Yes, you should seal the grout after application. Grout sealing is essential for preventing moisture penetration and staining, which can lead to mold growth and deterioration. After the grout has cured, apply a high-quality grout sealer evenly across the surface. This protective layer will simplify grout maintenance, making it easier to clean and prolonging its lifespan. Remember, regular maintenance and resealing every few years will keep your grout looking fresh and intact.
How Do I Fix Uneven Tile After Installation?
Imagine your floor as a canvas, each tile a brushstroke. If you've got uneven tiles, you'll want to reclaim that smooth surface. Start by evaluating the low spots with a level. Use tile leveling spacers for any gaps, then apply repair techniques like adding thin-set mortar beneath the uneven tiles. Let it cure, then re-grout where necessary. This way, you'll restore the harmony of your space and enjoy the freedom of a flawless floor.